前言 由于在开发中使用Flink大多数使用的是Flink Yarn cluster 模式运行,认识的一些同学的公司也是基于这种模式,所以今天就深入探讨一下这种模式的启动流程。
文章结构 文章结构如下:
启动命令介绍与shell脚本启动流程解析
CliFronted类解析(Flink程序启动入口)
YarnClusterDescriptor类解析
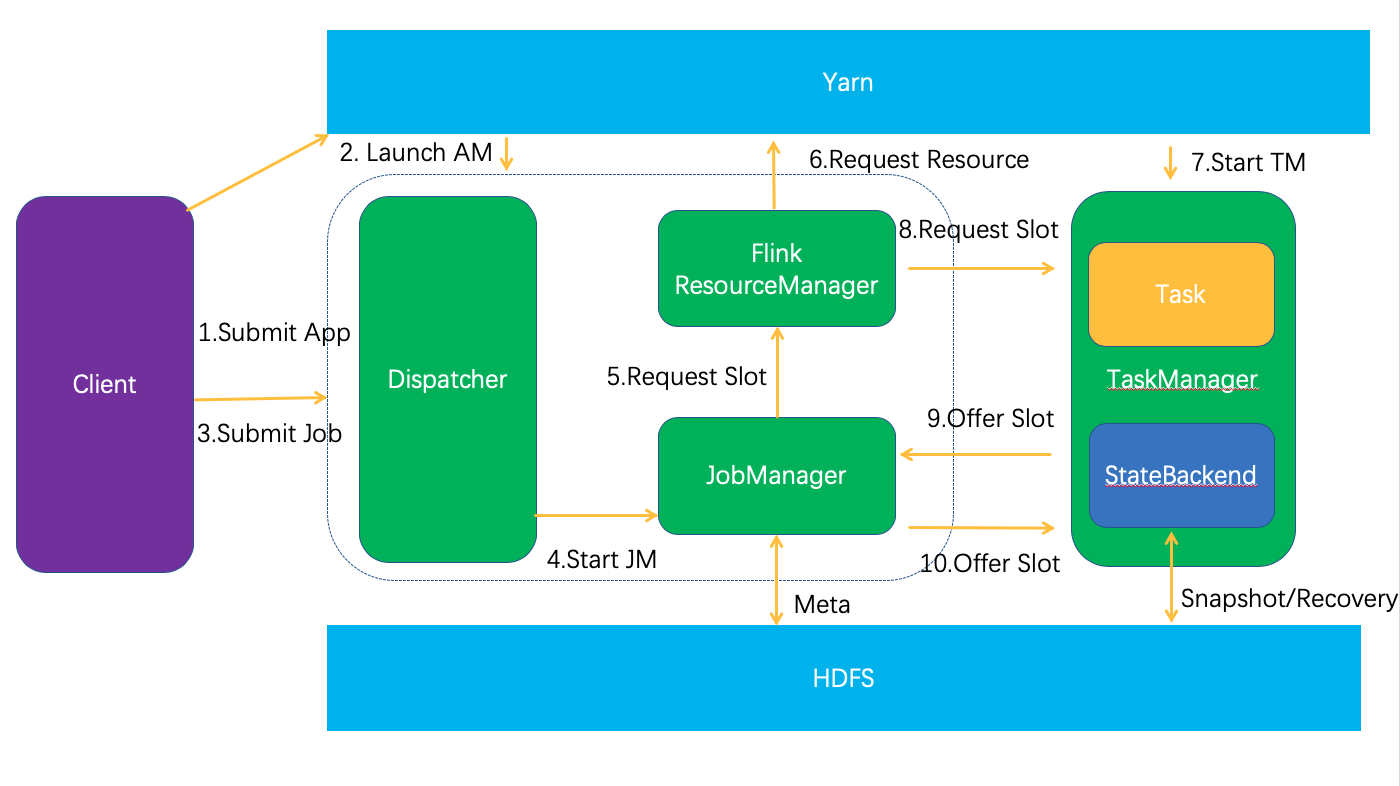
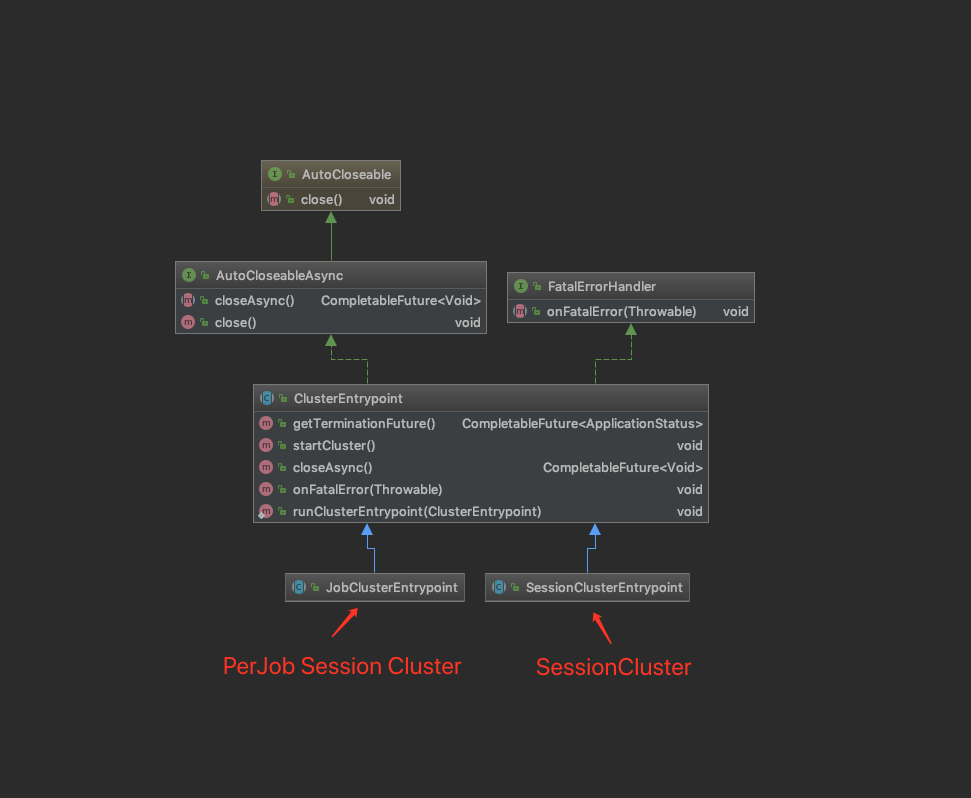
Flink Client 和 Cluster端总体交互示意图
环境 flink源码基于Flink1.9
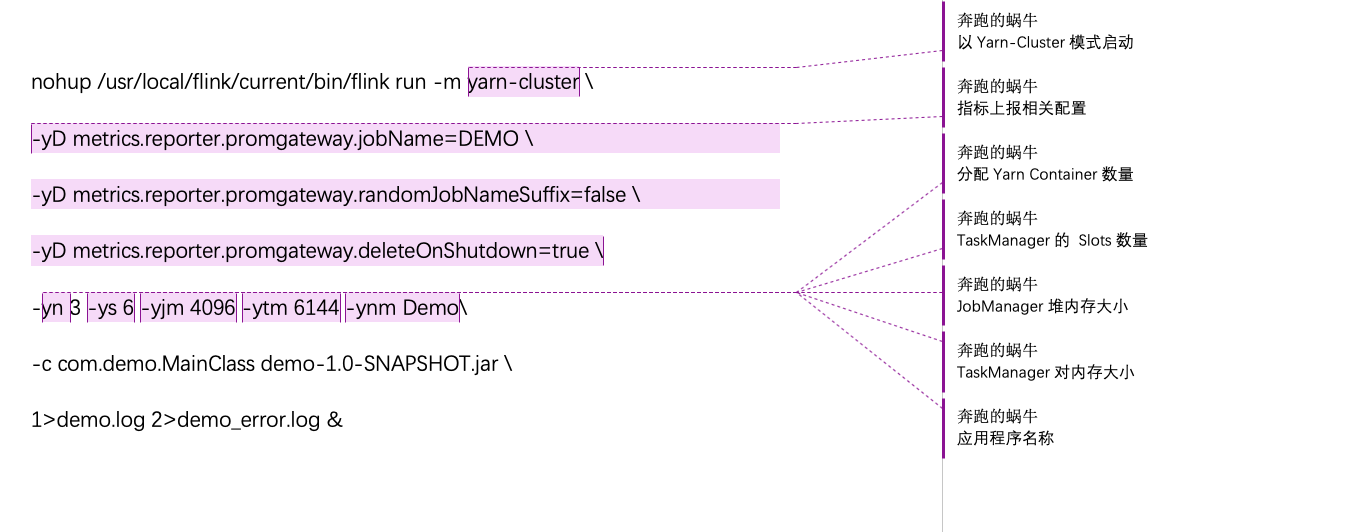
启动命令介绍与shell脚本启动流程解析 启动命令 在项目开发中,flink的启动命令一般如下
1
2
3
4
5
6
7
nohup /usr/local/flink/current/bin/flink run -m yarn-cluster \-yD metrics.reporter.promgateway.jobName=DEMO \ -yD metrics.reporter.promgateway.randomJobNameSuffix=false \ -yD metrics.reporter.promgateway.deleteOnShutdown=true \ -yn 3 -ys 6 -yjm 4096 -ytm 6144 -ynm Demo \ -c com.demo.MainClass demo-1.0-SNAPSHOT.jar \ 1>demo.log 2>demo_error.log &
相关解释
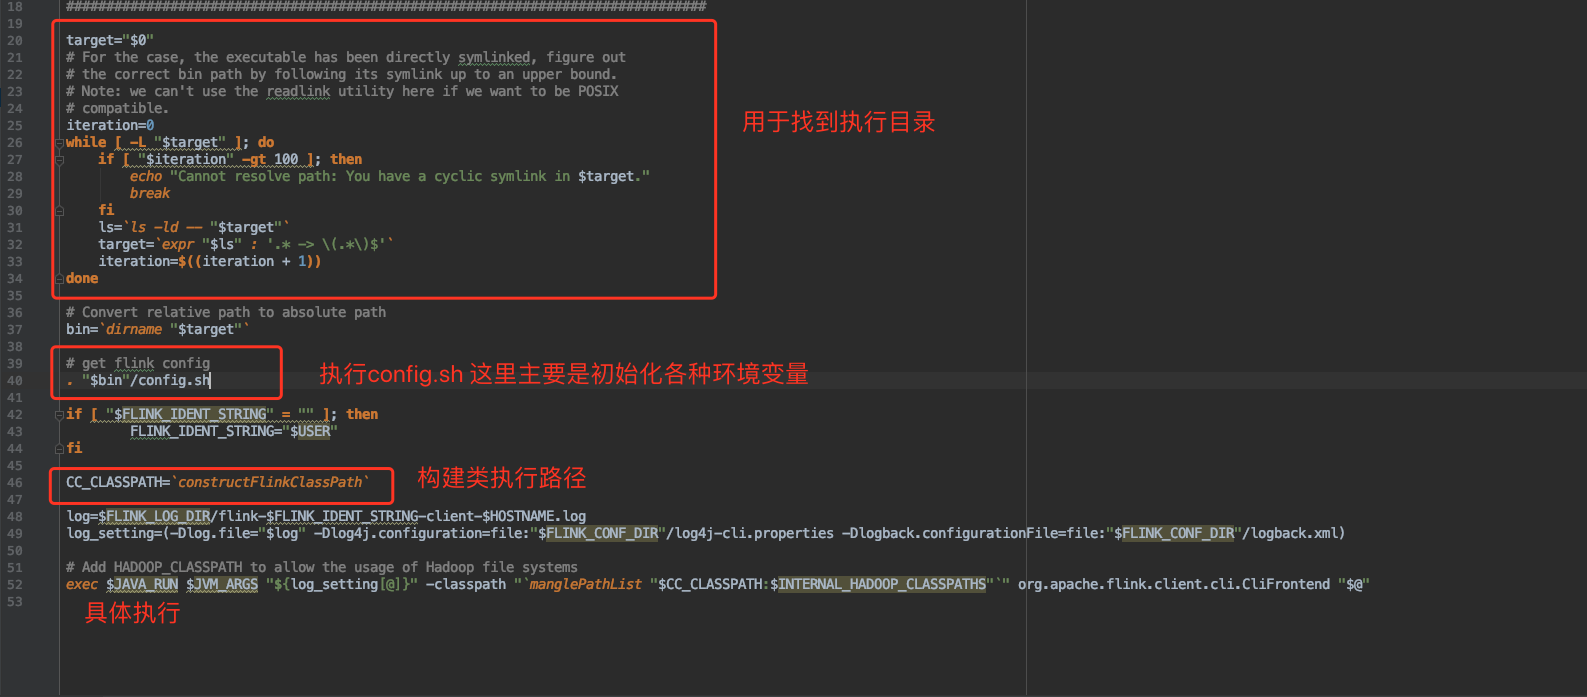
flink脚本解析
主要步骤有三步
如果target是软连接,则循环拿到最终的执行目录
执行config.sh
初始化之后拿到java执行目录,冰执行难CliFronted.java
config.sh 脚本解析 因此主要还是要看 config.sh
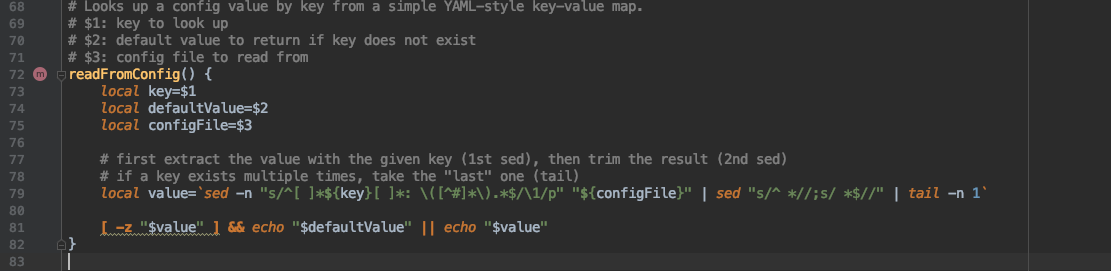
1
2
3
4
5
6
7
8
9
10
11
12
13
14
15
16
17
18
constructFlinkClassPath() { } manglePath(){ } manglePathList(){ } readFromConfig() { } #
从上面的脚本中可以看出,config.sh 做的事情很简单,主要是读取配置文件,加载环境变量
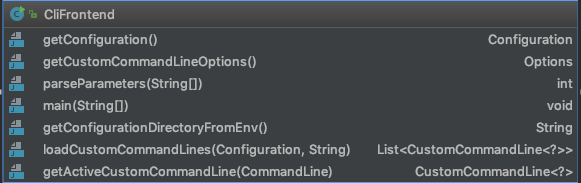
CliFronted类解析(Flink程序启动入口) 下面继续跟进到CliFronted类中,这是一个带有main函数的类,是整个应用的启动入口。
main函数主要步骤
获取配置目录
加载全局配置
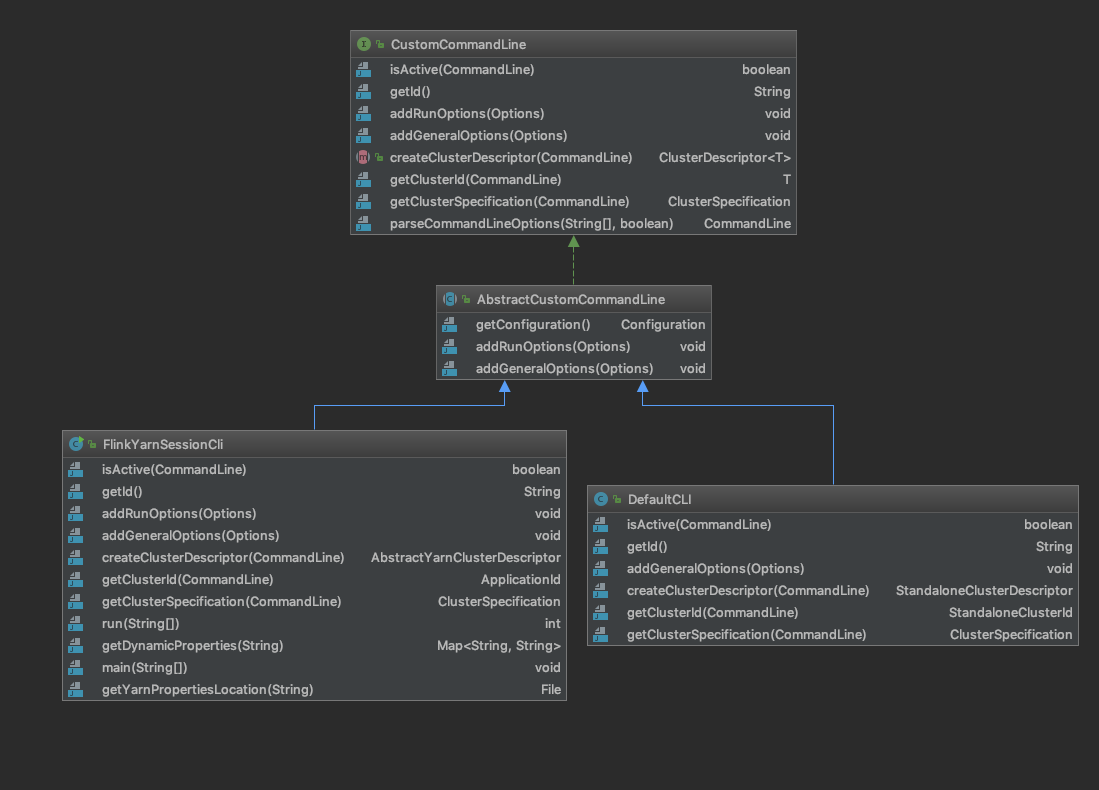
加载自定义CommondLine,这个CustomCommandLine的英文释义是“Custom command-line interface to load hooks for the command-line interface.”,翻译一下就是“自定义命令行接口来加载命令行接口的钩子。” 是一个接口,主要的子类有两个,一个FlinkYarnSessionCli,一个DefaultCli,主要作用是处理命令行,比如判断是否符合当前的类型,以及获取集群id,解析命令行参数等等。
构造CliFrontend,并且调用parseParameters
parseParameters 方法很简单,就是根据第一个参数的值调用响应的方法,比如我们是run,则调用run方法
1 2 3 4 5 6 7 8 9 10 11 12 13 14 15 16 17 18 19 20 21 22 23 24 25 26 27 28 29 30 31 32 33 34 35 36 37 38 39 40 41 42 43 44 45 46 47 48 49 50 51 protected void run (String[] args) throws Exception { LOG.info("Running 'run' command." ); final Options commandOptions = CliFrontendParser.getRunCommandOptions(); final Options commandLineOptions = CliFrontendParser.mergeOptions(commandOptions, customCommandLineOptions); final CommandLine commandLine = CliFrontendParser.parse(commandLineOptions, args, true ); final RunOptions runOptions = new RunOptions (commandLine); if (runOptions.isPrintHelp()) { CliFrontendParser.printHelpForRun(customCommandLines); return ; } if (!runOptions.isPython()) { if (runOptions.getJarFilePath() == null ) { throw new CliArgsException ("Java program should be specified a JAR file." ); } } final PackagedProgram program; try { LOG.info("Building program from JAR file" ); program = buildProgram(runOptions); } catch (FileNotFoundException e) { throw new CliArgsException ("Could not build the program from JAR file." , e); } final CustomCommandLine<?> customCommandLine = getActiveCustomCommandLine(commandLine); try { runProgram(customCommandLine, commandLine, runOptions, program); } finally { program.deleteExtractedLibraries(); } }
这里请看 FlinkYarnSessionCli 的 isActive,因为我们传入了 -m yarn-cluster,所以 jobManagerOption 为 yarn-cluster,而ID = “yarn-cluster”;所以第一个条件就满足,所以返回的是FlinkYarnSessionCli
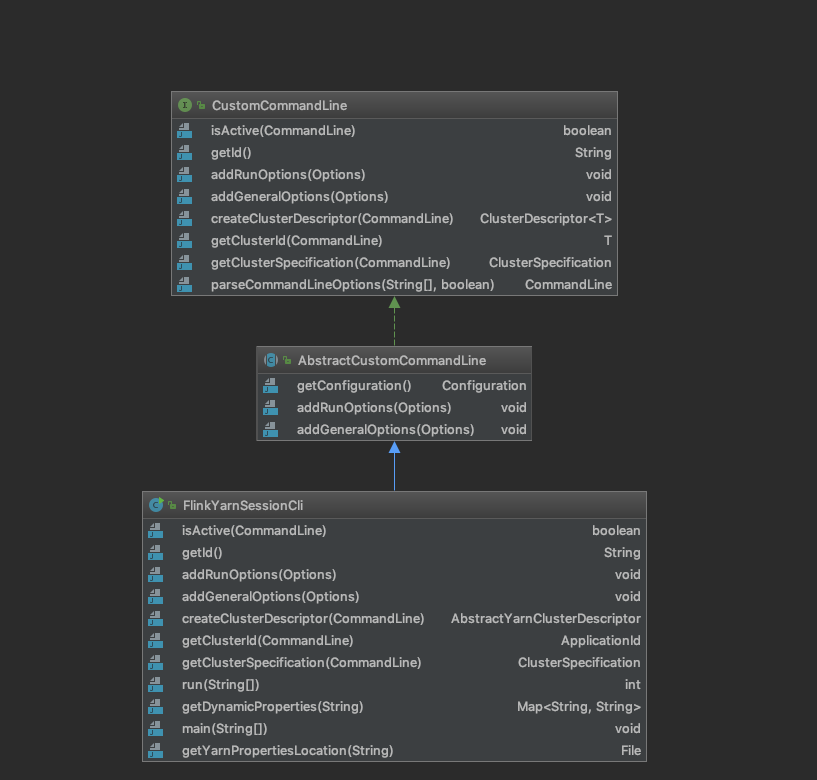
FlinkYarnSessionCli的类结构图
1
2
3
4
5
6
7
8
9
10
@Override public boolean isActive (CommandLine commandLine) { String jobManagerOption = commandLine.getOptionValue(addressOption.getOpt(), null ); boolean yarnJobManager = ID.equals(jobManagerOption); boolean yarnAppId = commandLine.hasOption(applicationId.getOpt()); return yarnJobManager || yarnAppId || (isYarnPropertiesFileMode(commandLine) && yarnApplicationIdFromYarnProperties != null ); }
下面接着看runProgroam方法。
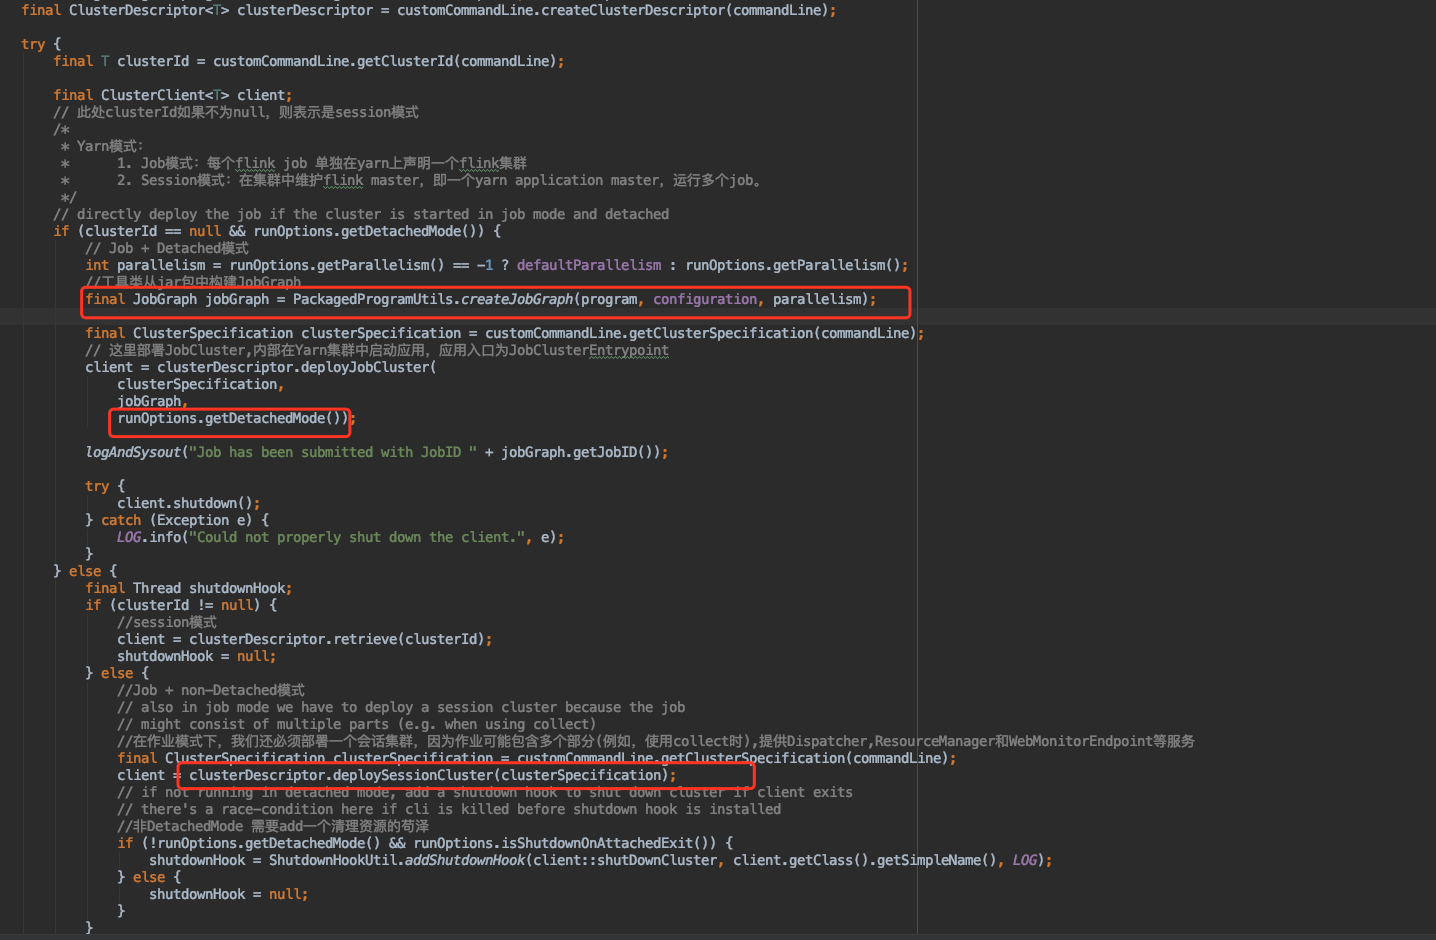
1
2
3
4
5
6
7
8
9
10
11
12
13
14
15
16
17
18
19
20
21
22
23
24
25
26
27
28
29
30
31
32
33
34
35
36
37
38
39
40
41
42
43
44
45
46
47
48
49
50
51
52
53
54
55
56
57
58
59
60
61
62
63
64
65
66
67
68
69
70
private <T> void runProgram (CustomCommandLine<T> customCommandLine, CommandLine commandLine,RunOptions runOptions,PackagedProgram program) throws ProgramInvocationException, FlinkException {final ClusterDescriptor<T> clusterDescriptor = customCommandLine.createClusterDescriptor(commandLine);try { final T clusterId = customCommandLine.getClusterId(commandLine); final ClusterClient<T> client; if (clusterId == null && runOptions.getDetachedMode()) { int parallelism = runOptions.getParallelism() == -1 ? defaultParallelism : runOptions.getParallelism(); final JobGraph jobGraph = PackagedProgramUtils.createJobGraph(program, configuration, parallelism); final ClusterSpecification clusterSpecification = customCommandLine.getClusterSpecification(commandLine); client = clusterDescriptor.deployJobCluster( clusterSpecification, jobGraph, runOptions.getDetachedMode()); try { client.shutdown(); } catch (Exception e) { LOG.info("Could not properly shut down the client." , e); } } else { final Thread shutdownHook; if (clusterId != null ) { client = clusterDescriptor.retrieve(clusterId); shutdownHook = null ; } else { final ClusterSpecification clusterSpecification = customCommandLine.getClusterSpecification(commandLine); client = clusterDescriptor.deploySessionCluster(clusterSpecification); if (!runOptions.getDetachedMode() && runOptions.isShutdownOnAttachedExit()) { shutdownHook = ShutdownHookUtil.addShutdownHook(client::shutDownCluster, client.getClass().getSimpleName(), LOG); } else { shutdownHook = null ; } } try { ... executeProgram(program, client, userParallelism); } finally { ... } } } finally { ... } }
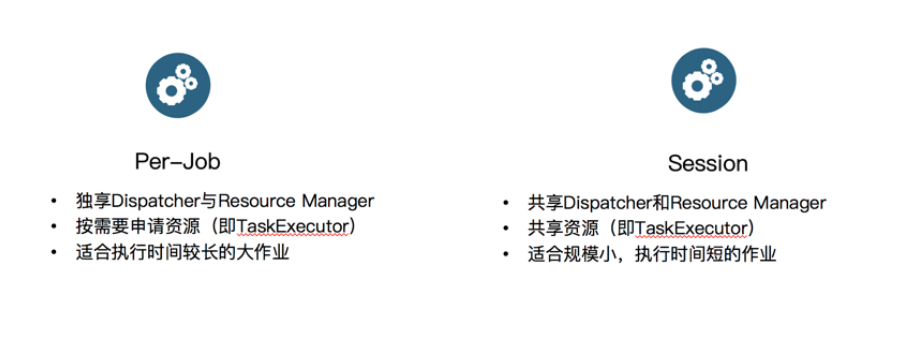
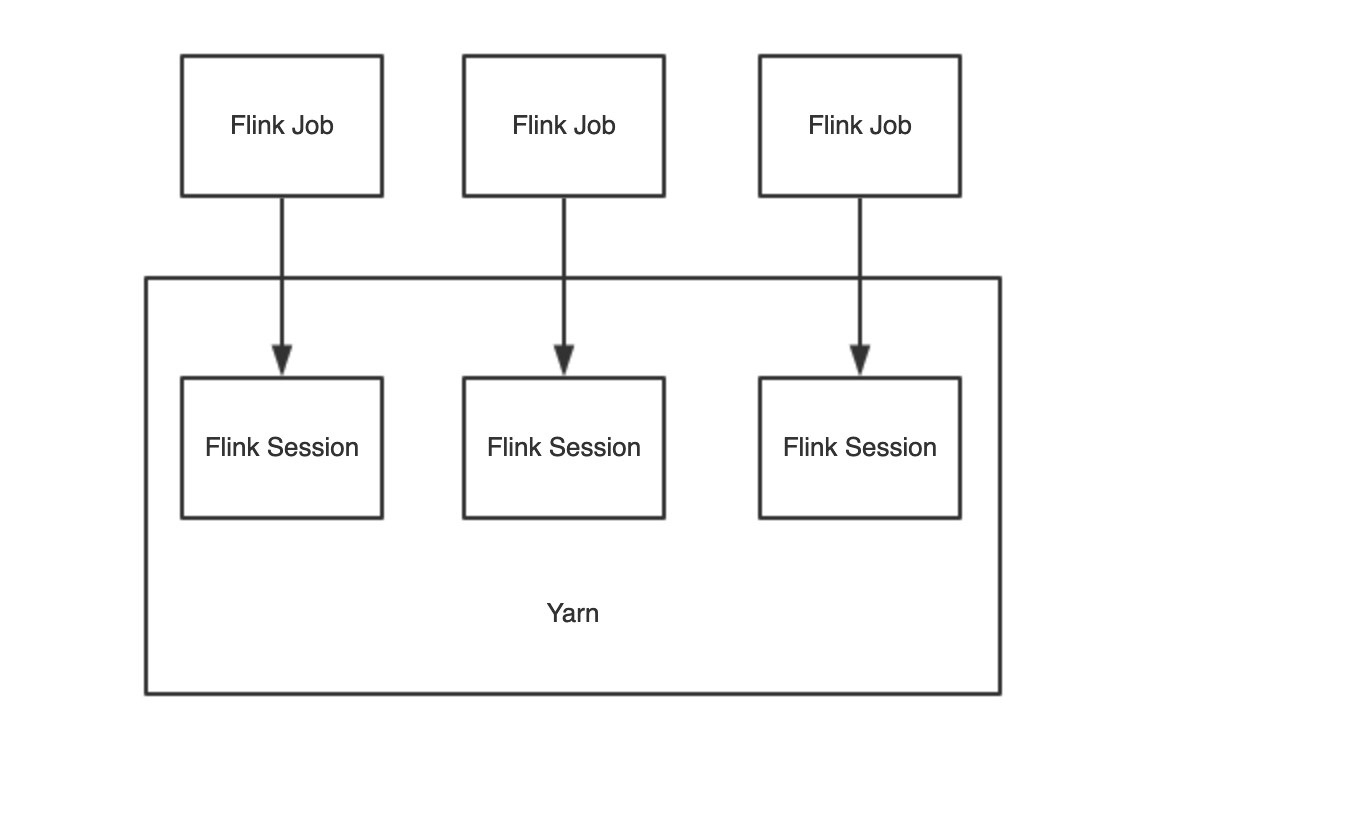
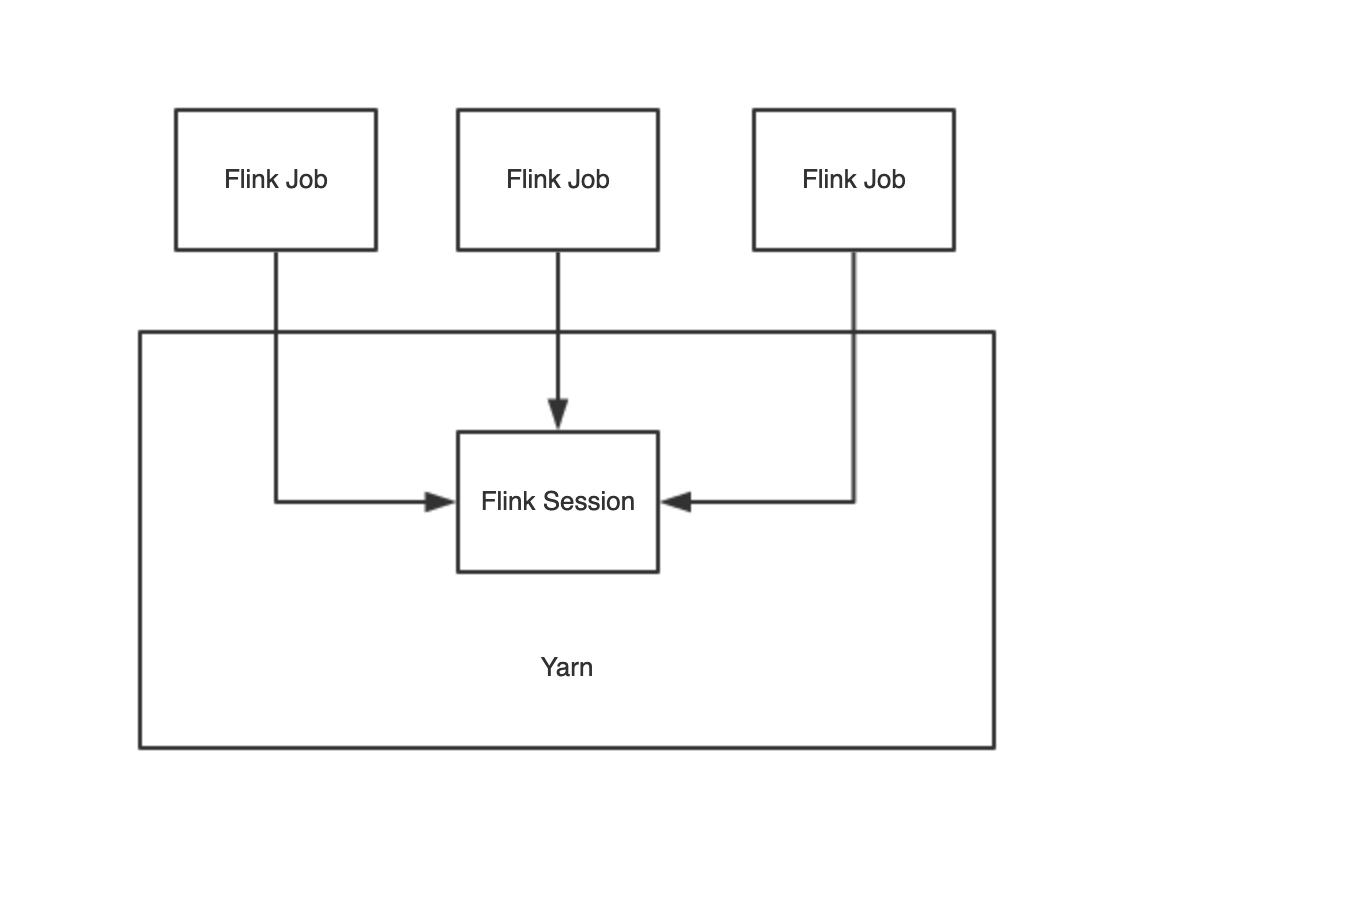
YarnClusterDescriptor类解析 两种模式示意图
Yarn Job 模式 每一个Flink Job 在Yarn上启动一个FLink集群,提交一次,生成一个Yarn Session,并且如果有 -d 命令参数,则启动 Yarn Job 模式下面的 Per Job 模式,有一些细微的差别。
这种适合大作业模式,一般项目中用这种比较多,可以更好的资源隔离,防止互相干扰。
Yarn Session 模式 需要先执行 yarn-session.sh 命令,yarn集群中维护Flink Master,即一个yarn application master,运行多个job。启动任务之前需要先启动一个一直运行的Flink集群,这种适合小作业模式
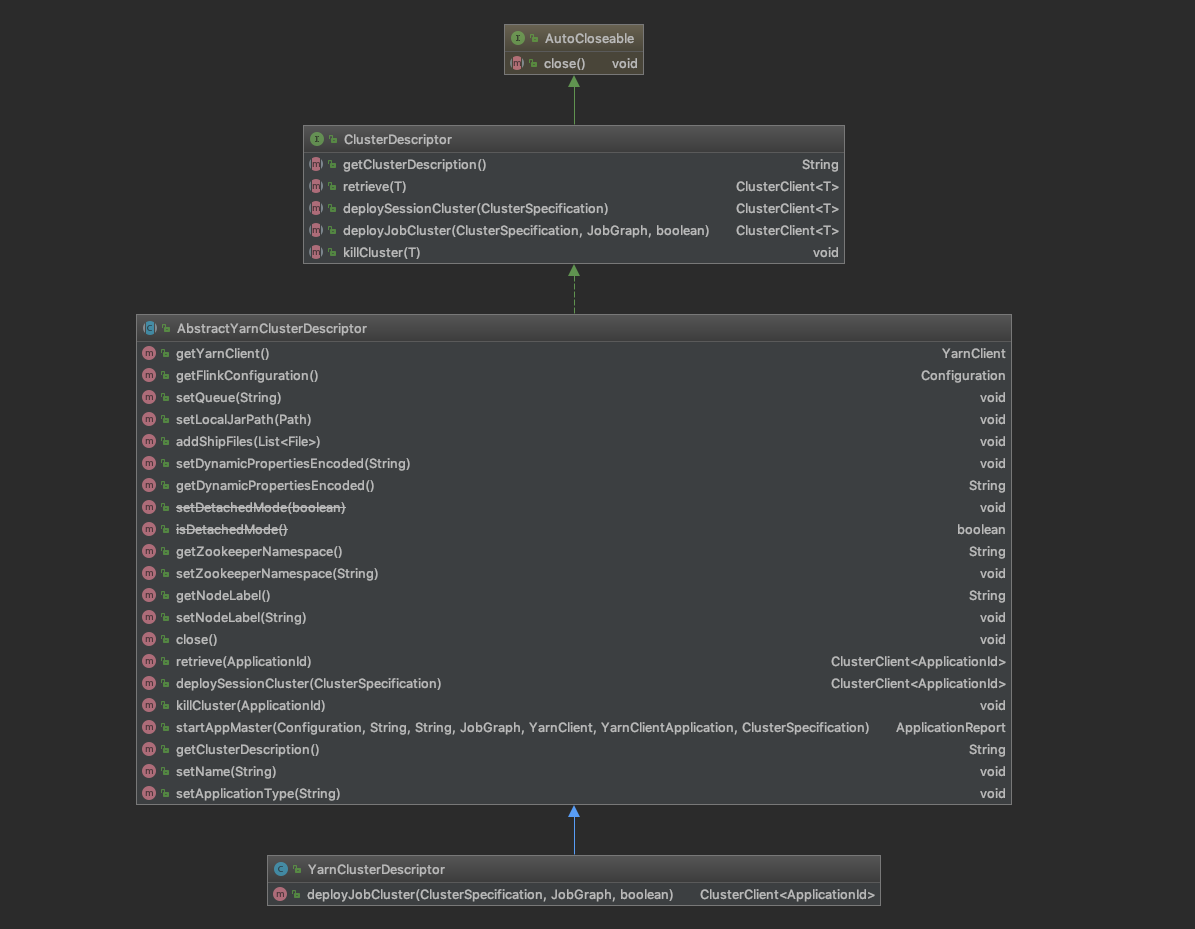
类结构图 YarnClusterDescriptor的类结构图如下,
来看看 customCommandLine.createClusterDescriptor(commandLine); 调用堆栈如下,返回YarnClusterDescriptor。
1
2
3
4
5
6
7
8
9
customCommandLine.createClusterDescriptor(commandLine); createClusterDescriptor createDescriptor getClusterDescriptor(); return YarnClusterDescriptor return yarnClusterDescriptor
YarnClusterDescriptor主要有两个方法核心方法,deployJobCluster 用于部署 per job 模式的作业,,deploySessionCluster用于部署小session类型的作业。 startAppMaster用于启动ApplicationMaster等组件。
Yarn Session Cluster模式部署源码分析 clusterDescriptor.deploySessionCluster(clusterSpecification)调用堆栈
1
2
3
4
5
6
7
8
9
10
11
12
13
14
15
16
17
18
19
20
21
22
23
24
25
26
27
28
29
30
31
32
33
34
35
36
clusterDescriptor.deploySessionCluster(clusterSpecification) deployInternal() validateClusterSpecification() checkYarnQueues() yarnClient.createApplication() validateClusterResources() startAppMaster() setupApplicationMasterContainer(yarnClusterEntrypoint) startCommandValues.put("class" , yarnClusterEntrypoint); amContainer.setLocalResources(localResources); final Map<String, String> appMasterEnv = new HashMap <>(); ... if (dynamicPropertiesEncoded != null ) { appMasterEnv.put(YarnConfigKeys.ENV_DYNAMIC_PROPERTIES, dynamicPropertiesEncoded); } amContainer.setEnvironment(appMasterEnv); yarnClient.submitApplication(appContext); loop: while (true ) { }
核心方法是 deployInternal,做了以下几件事情:
校验集群资源
检查队列
创建Yarn Application
启动ApplicationMaster
初始化文件系统
将应用程序主jar复制到文件系统
创建一个本地资源来指向目标jar路径
logback log4j 日志配置检查
上传文件,设置flink配置(taskmanager number slot等)
将jobGraph序列化到文件并且上传(如果是Per Job 模式) 安全相关配置
设置Container相关的配置,比如设置container的入口,配置jvm参数等。
提交application
Yarn Per Job 模式部署源码解析 下面来看看 Per-job model的启动流程,Per job model 在CliFronted类中的runProgram中 line 233 行调用PackageProgramUtils生成了JobGraph实例,并且把实例传入到了 YarnclusterDescriptor 的 deployJobCluster方法,deployJobCluster方法调用getYarnJobClusterEntrypoint方法拿到的正是YarnJobClusterEntrypoint类,然后再次调用 AbstractYarnClusterDescriptor 的 deployInternal 方法,流程与Yarn Session模式一模一样。
1
2
3
4
5
6
7
8
9
10
11
12
13
14
15
16
17
18
19
20
21
@Override public ClusterClient<ApplicationId> deployJobCluster ( ClusterSpecification clusterSpecification, JobGraph jobGraph, boolean detached) throws ClusterDeploymentException { jobGraph.setAllowQueuedScheduling(true ); try { return deployInternal( clusterSpecification, "Flink per-job cluster" , getYarnJobClusterEntrypoint(), jobGraph, detached); } catch (Exception e) { throw new ClusterDeploymentException ("Could not deploy Yarn job cluster." , e); } }
在 line 507 中,调用startAppMaster的时候会传入 jobGraph
继续跟进,在startAppMaster方法中的有一个判断,如果jobGraph不为空,则会把这个文件上传。
小结 在本文中主要介绍了项目开发的一般启动脚本和解析,然后详细介绍了flink命令和config.sh的脚本源码。 接着解读了Flink入口类CliFrontend类,并介绍了YarnClusterDescriptor类和两种不同的Yarn Session Job 模式的源码。
后面会继续介绍两种模式的不同的入口类了,在下一章将会深入探讨这两种模式的启动流程。